|
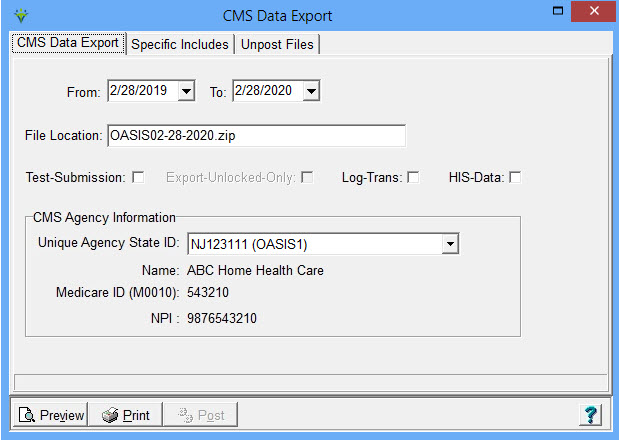
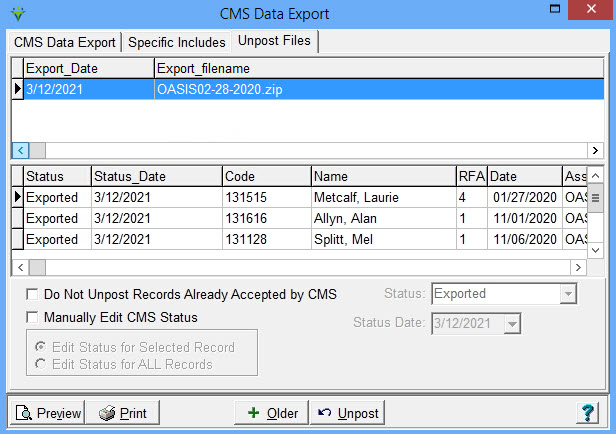
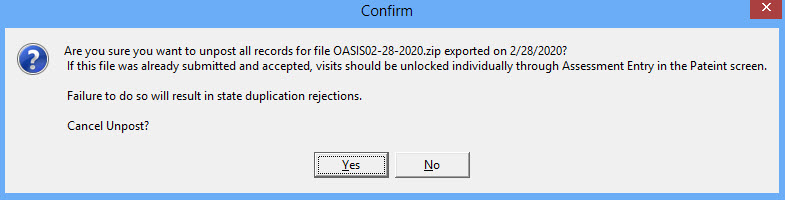
Assessment Export The Assessment Export provides the ability to create an export file for OASIS assessments or HIS/HOPE records that are ready for submission to iQIES system. Refer to the OASIS or HOPE export guides for detailed information. Go to Clinical > Assessment Export. Creating the Export File: From and To Dates: Enter a date range encompassing the assessment dates. It is recommended to use an early From date to capture late or changed assessments for submission. File Location: Assign a unique file name for each file that is created with a .ZIP extension. Test-Submission: Check this box only if creating a file for benchmarking software (e.g. test files to ASAP with your assigned Testing ID). Test files do not get marked as exported and this box should not be checked if creating files to send to iQIES. Export-Unlocked-Only: Check if creating OASIS export files to submit to a benchmarking vendor only or creating a test file. This will pick up assessments that are in an Unlocked status. The Test Submission box must be checked to enable this setting. Log-Trans: If selected, a record of the assessment file creation will be written to the System Log report. Hospice Data: Check the option only if creating an export file for HIS/HOPE records. Leave unchecked for OASIS. Submit to SIMPLE: If enabled, check this option to submit assessments to Simple. This option is currently in beta testing. Unique Agency State ID: Select your agency's ID number (setup in File > File Maintenance > Entity > CMS Agency Type on the Other-Info tab). If this number is changed after an assessment has been entered, that assessment must be moved to Needs Correction in the Clinical Chart, edited, revalidated, saved and reposted to the Billing Module to write the correct agency ID to the assessment record. Specific Includes tab: Use this tab to select specific patient(s) for export if needed. Clear the selection after the assessment export file has been created so all patients/records are available for export next time. Preview or Print: Review the OASIS or Hospice Export report to confirm which records will be included in the export file. Post: This button is enabled after the Assessment Report has been Previewed or Printed. Press Post to create the export file. The user can then upload the file to iQIES. Submitting the Export File: OASIS - Starting 1/1/2020 all OASIS assessments must be submitted to iQIES: https://iqies.cms.gov/users/home. HOPE - Starting 10/01/2025 HOPE records must be submitted to iQIES: https://iqies.cms.gov/users/home while HIS records are still to be submitted to QIES. Un-posting an Export File: An export file should not be Un-Posted unless the entire file needs to be recreated (for example, an issue occurred during original file creation or the entire file rejected). Unlocking of individual patient OASIS or HIS/HOPE records is done from the Patient file. Click on the Unpost Files tab. Highlight the export file to be unposted and press the Unpost button. To unpost a Hospice file, the Hospice Data box must be checked on the CMS Data Export tab first. To select files older than 90 days, click the +Older button.
After clicking Unpost, enter the Master Password, and if the criteria for unposting a file has been met as described below, press "No" in the confirmation window.
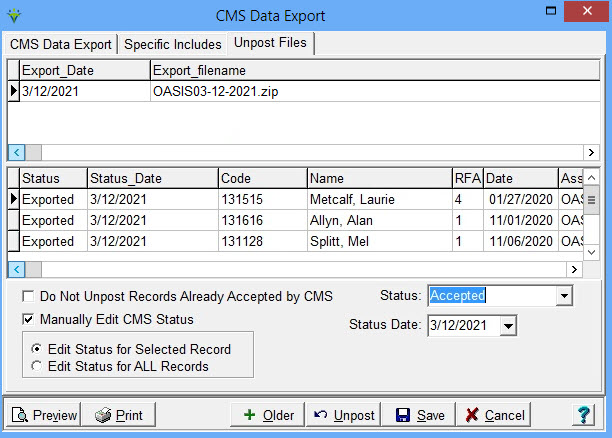
Entering CMS Acceptance Status Manually: Click on the Unpost Files tab. Highlight the export file in the top grid that has the OASIS file to be marked as Accepted or Rejected. Check the box for Manually Edit CMS Status. Edit Status for Selected Record: if this radio button is selected, click on the assessment in the grid to mark the status for only the selected assessment (used if one assessment status is different from the other assessments in the file). Edit Status for ALL Records: if this radio button is selected, all assessments in the selected file will be updated with the specified Status. After entering the Master Password, the 'Status' and 'Status Date' fields will be enabled. Select Accepted or Rejected and the date of acceptance or rejection. The Status Date for Accepted records is used on reports to determine if timely submission was met. Press Save after making changes.
|