|
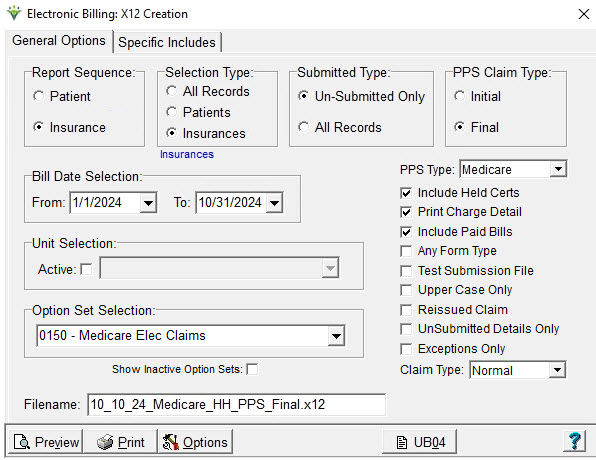
Electronic Claims Electronic Claims is where 837 claim files, Home Health NOA and Hospice notices can be created for submission to a payer or clearinghouse. Batch claims can be created in ANSI X12 professional or institutional formats based on the Option Set selected in the drop-down. Review the Electronic Submission Exceptions Guide for help with addressing claim exception reasons. If your agency has contracted with Netsmart for the Zirmed (Waystar) clearinghouse, review the Zirmed Interface Guide. Go to Billing > Electronic Claims.  Report Sequence: Select Patient or Insurance Selection Type: Select All Records or individual Patients/Insurances (use Specific Includes tab to specify individual patients or insurances). Specific Includes tab: This tab appears if selected Patients or Insurances is chosen. For specific insurance selection, the 'Store' button can be used to save the insurance selection for future use for the selected option set. The 'Clear' button will clear the insurance selection for the current run only. To permanently detach an insurance from an option set, highlight the insurance, press Remove and then Store. Submitted Type: Set to 'Un-Submitted Only,' unless claims are being re-submitted (including Void/Replace Claim Types), in which case 'All Records' should be chosen. PPS Claim Type: Select Initial (RAP) or Final Date Selection: Enter the Bill Date from the Billing Audit for this claim period. Unit Selection: For agencies with multiple Units, check the 'Active' box under Unit Selection and select the Unit for which the claim file is being created. Otherwise leave un-checked. PPS Type: Select Medicare or NY Medicaid (if PPS Claim Type) Include Held Orders: Select this option to include claims for which the 485 for the claim period is marked Held (indicated on Patient > Certify > Orders tab). Print Charge Detail: Select this option to see charge detail on the Electronic Claim Submission report. Include Paid Bills: Select this option to include claims that have a zero balance A/R record. This setting is ignored for 2021 RAPs since they always have a zero balance. Any Form Type: Select this option to include claims for insurances regardless of the claim form type specified in the insurance setup. Test Submission File: Select this option if sending a test file (check with the payer to determine if they want a test indicator in the file). Upper Case Only: Select this option to create a file with all upper case letters (recommended)
Reissued Claim: Selecting this option will write “18” to the
BHT02 segment, indicating to Medicare that this is not a duplicate
claim. Rarely used. UnSubmitted Details Only: Enabled when selecting non-PPS Option set. Used to generate claims for just the late charges posted to the same bill date as the timely claim run. Exceptions Only: Select this option to see only claims that have errors needing correction. Claim
Type: Defaults to "Normal." If choose "Replacement" or "Cancel" the
Bill Frequency code will be generated accordingly and the original
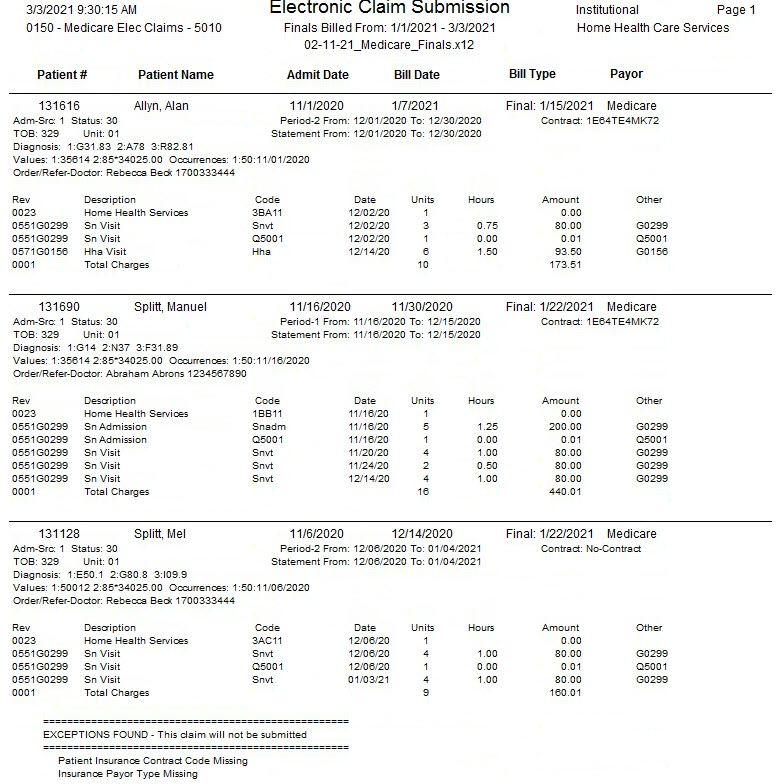
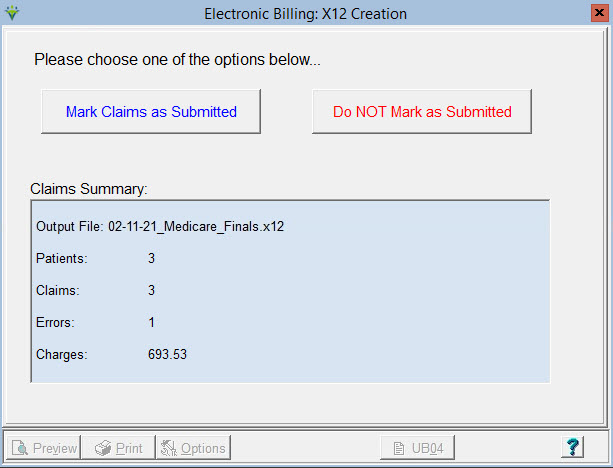
claim DCN will pull to claim. Option Set Selection: Use the drop-down arrow to select the Option Set to be used for electronic claim file creation. Option sets give you the ability to customize the claim based on the payor requirements. Show Inactive Option Sets: Select this option to see option sets that have been marked inactive. Inactive option sets are identified by an * at the beginning of the option set name. To mark an option set inactive, click 'Options' and 'Rename' and type an * at the front of the option set name; for example, "*Medicare PPS." Filename: Enter a unique file name with a .X12 extension. Special characters are not allowed in file names. Check if your payor has a required naming convention. Options Button: View the Billing Options Wizard online help for instructions with this option. UB04/1500 Button: Click on the UB04 or 1500 buttons to preview Institutional files as a UB04 form or Professional claim files as a 1500 form. Note: This is for informational purposes only, if sending the hard copy claim to the payer, use the Printed Claims menu to generate claims. To create an ANSI X12 837 Electronic Claim file: Click on the Preview button after your selections have been made. The Electronic Claim Submission Report appears. Review the report for errors, noted by the message “EXCEPTIONS FOUND – This patient not exported.” After the exceptions have been corrected and the report is printed or saved to .PDF, the electronic claim file will be ready for transmission to the payer. If the claim is ready to be sent to the payer, choose the "Mark as Submitted" prompt. If you are not ready to send the file, choose "Do NOT Mark as Submitted."
Sample Report: 
|
